Tutorial on a realistic eye...Tips and tricks I've learned along the way...
- marinburnett
- May 2, 2016
- 4 min read
This is one of my most popular images... I call it "Hopeful eyes" and it is a study on drawing a realistic eye.

I received several questions on facebook when I posted this piece on my various art groups for feedback. Many people said they could never do this... or asked questions about how I did it... But if I can, YOU CAN.... SO... here it is...
A Tutorial for novices on how to draw a realistic eye
So first off,.. I am, as we know, self-taught. I always thought there was something amazing about the eyes in a great portrait. People say... "the eyes follow you." But really I think it is where our eyes are drawn. We look to the eyes first, so I pay special attention to them in all my portraits.
How did you get the eye to look wet?
The short answer is... a white jelly roll pen.

These things are PERFECT for doing the highlights on the ball of the eye and getting the edges of the eye to look like they are reflecting light the way a real eye would. GET SOME.

TIP: If you are working in pastels or charcoal especially, and the pen won't write well, spray it with some Fixatif (pictured left - they have them for pastels and charcoals).
Let it dry and when its done the pen will move more more smoothly across the paper.
You can get this at most any art supply
Where did you learn to draw like that?
The short answer is... Slowly and from all over the place, but first and foremost is a youtube video I watched a while back that broke down things so well it has stuck with me ever since.
I work in pastels so this tutorial works in that medium. It comes from The Virtual Instructor, an AMAZING website that has some of the best art tutorials I have found in my efforts to become a better artist.
What I have learned most though from drawing eyes and other features as well, is the importance of drawing what you SEE, not the subject itself.
What I mean by that is the following... If I told you to draw an eye, as a novice, as I was, your brain may tell you ...
"OK... an eye is an almond with a circle in the middle and curved lines for lashes."
Like this...

This looks like what my son will draw a few years from now and what I would have drawn a few years ago.
BUT this is what you picture in your HEAD as an eye. What you need to do is use your EYES and draw what you SEE.
Don't draw an "eye," LOOK at the picture. STARE at it. Seriously... STARE....
Listen to something on the TV or radio to distract you until what you see is shapes, lights and shadows.... THEN start to draw. One line at a time. until you get a shell...
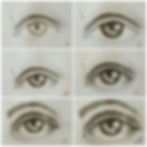
Like this... I'll show you a quick sketch I did, step-by-step. REMEMBER and FORGIVE... this is a quick sketch to give you an idea...

1. The "almond" IS largely right. but make sure you leave a little curve for the tear duct
2. Top hood and bottom shadow
3. Iris - note... you can rarely see the whole iris so I left a bit more than a half moon.
4. Pupil - note... place the pupil where it would be in the middle the iris if it were a full circle.
5. HIGHLIGHT - This is IMPORTANT and is something easily forgotten. Leave a white space,here to make sure the eye looks reflective.
6. Brow - begin shading...
So there are the "bones" for the eye. You can take liberties with the shapes ans sizes of the iris, tear duct, the almond, top hood... any of it.. but largely, this is the general framework. Moving on...

1. Bones...
2.Darken the Pupil - notice that the ring around the outside of the pupil is dark. Look at a few photos of pupils on lighter colored eyes... you will see this.
3. Shading eyeball - So the eyeball is just that... a ball; a sphere. So remember to shade the outer portions of the "white" of the eye to make it look spherical.
NOTE: The white of the eye isn't actually WHITE. Only the highlights should be kept absolute white.
4. More shading of entire eye and beginning lashes- notice the small strip of white left on the lower right corner of the eye. This is one of those easily forgettable details.
5. More shading - notice the shading near the tear duct.
6. Done! AT least for now.
This is not the best or worst of my sketches... but I hope it helps.
Remember... DRAW what you see, not what the SUBJECT IS.... Step by step... line by line.
See you soon!!
M.A.


